Installation of MySQL Server 8.0 Community on Ubuntu 16.04
Hi everyone, in this post I'll write steps to install MySQL Server 8.0 on Ubuntu Linux 16.04 version. Below are the steps to be done for the same-
1. Setting up MySQL 8.0 Repository
2. De-packaginig Debian repository
3. Installing MySQL Server 8.0 Community Version
4. Creating new user, database, permission grant
5. Connecting MySQL Server via remote MySQL Workbench
1. Setting up MySQL 8.0 Repository
3. Installing MySQL Server 8.0 Community Version
1. Setting up MySQL 8.0 Repository
2. De-packaginig Debian repository
3. Installing MySQL Server 8.0 Community Version
4. Creating new user, database, permission grant
5. Connecting MySQL Server via remote MySQL Workbench
1. Setting up MySQL 8.0 Repository
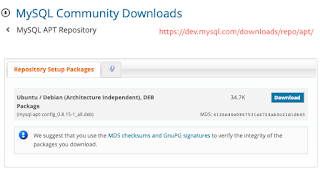
First we need to setup repository for MySQL 8 as Ubuntu 16.04 doesn't get shipped with the same. In order to do so, visit the APT repo page and download the *.deb package as shown below-
URL- https://dev.mysql.com/downloads/repo/apt/
Alternatively use CURL via command line/ terminal as follow-
cd /tmp/
wget https://dev.mysql.com/get/mysql-apt-config_0.8.15-1_all.deb
2. De-packaginig Debian package
Now we need to de-package the Debian package as
sudo dpkg -i mysql-apt-config_0.8.10-1_all.deb
Once run, there will be a screen available for confirmation for respective installation of package, leave the defaults and click OK as shown below-
Now our repository has been setup and we are ready for MySQL 8 installation on Ubuntu 16.04. Execute below commands to install MySQL Server-
Update your system to avoid any dependencies issue during the installation process
sudo apt-get update
Install MySQL Server (unsure installation)
sudo apt-get install mysql-server
Configure the root user password when prompted-
Make sure you use a strong password-
And that's done!
What's Next...
Let's check mysql server status via command line-
root@ubuntu:~# service mysql status
● mysql.service - MySQL Community Server
Loaded: loaded (/lib/systemd/system/mysql.service; enabled; vendor preset: enabled)
Active: active (running) since Tue 2020-05-26 02:45:02 PDT; 21h ago
Docs: man:mysqld(8)
http://dev.mysql.com/doc/refman/en/using-systemd.html
Process: 14867 ExecStartPre=/usr/share/mysql-8.0/mysql-systemd-start pre (code=exited, status=0/SUCCESS)
Main PID: 14910 (mysqld)
Status: "Server is operational"
Tasks: 65
Memory: 513.1M
CPU: 13min 25.948s
CGroup: /system.slice/mysql.service
└─14910 /usr/sbin/mysqld
May 26 02:45:01 ubuntu systemd[1]: Starting MySQL Community Server...
May 26 02:45:02 ubuntu systemd[1]: Started MySQL Community Server.
Congratulations on successful installation of MySQL Server 8 on Ubuntu 16.04!
4. Creating a new user, database and permission grant
Referring to my Original Post Following can be used to create a new user, because we don't want root user credentials to be provided to developers.
Login to MySQL with super user root or user with full rights
Execute below command
CREATE USER 'username'@'hostname' IDENTIFIED BY 'YourPassword';
Example:
CREATE USER 'fmsuser'@'%' IDENTIFIED BY 'Pass1@210617';
Execute below command
CREATE USER 'username'@'hostname' IDENTIFIED BY 'YourPassword';
Example:
CREATE USER 'fmsuser'@'%' IDENTIFIED BY 'Pass1@210617';
'%' means user can connect from any host, otherwise specified host can only connect to your mysql server instance
Create a new database
CREATE DATABASE mydatabase CHARACTER SET utf8mb4 COLLATE utf8mb4_unicode_ci;
Grant Permission
GRANT ALL PRIVILEGES ON mydatabase. * TO 'fmsuser'@'%'
FLUSH PRIVILEGES;
FLUSH PRIVILEGES;
5. Connecting MySQL Server via remote MySQL Workbench
Now we are ready to access our MySQL Database Server via remote client MySQL Workbench. Default port for MySQL Server is 3306.
Now, Open MySQL Workbench and provide connection details with respective user credentials-
Test the connection as shown in the screenshot-
Bingo! We are now successfully connected to our MySQL Server instance.


This is really an amazing post, Thanks for sharing.
ReplyDeleteDevOps Online Training institute
DevOps Online Training in Hyderabad
DevOps Course in Hyderabad